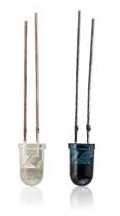
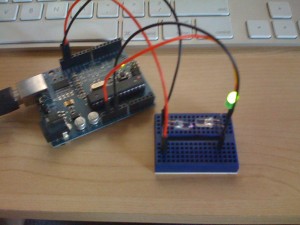
 I’ve got a project coming up that deals with IR data transmission, so I thought I’d take some time and make a simple IR circuit to prove that I could. This is a very very simple IR Circuit. Basically, it goes as follows. (I’ll get a schematic up here eventually. I haven’t had success actuallly being able to make one… Linux: Still not ready for the Desktop IMO)
I have the classic Arduino “Blink” sketch loaded up to the Arduino. It goes through pin 13 and the close by Gnd pin. Those pins are connected to the mini-breadboard which has an IR LED connected to it. So when the LED would normally blink, the IR LED blinks. We dont’ see anything because we can’t see Infrared. Immediately across from the IR emitter, is the IR Detector. It is an Infrared PhotoDiode. This thing looks like and LED, and I think that was not the best decision. First, you must remember which is the detector and which is the emitter (I got my pair from Radio shack 😛 ) and secondly there is no marking which suggests that the detector is not simply a clear LED waiting to be turned on. Additionally, I think because the device is receiving light rather than sending it, this thing probably ought to look more like a LDR (Light Dependent Resistor)… maybe with a special marking somewhere? Bad Design Radio Shack… but it’s probably not your fault. You don’t make these things, other people make these things.
Anyway, the IR emitter blinks into the IR Detector. The Detector in this case acts as a switch. The more Infrared light that comes into it, the higher voltage it produces. We use that voltage to bridge between the Gnd, and a Green LED connected to the 3v3 pin on the Arduino. The Result? Blinking green light!
As expected, when you drape something between the emitter and the detector, the green light stops blinking. One thing I found though is that light can be sneaky. Initially, I placed a peice of cardboard (product packaging) between the emitter and detector and the light didn’t stop blinking, it just blinked dimmer. At first I thought the light was somehow getting through the cardboard… which would have been a superman-feat of physics. In reality, the light was bouncing down from the cardboard (which was a bit reflective) and then bouncing up off the breadboard to the detector. As not all of the light was making it, the detector wasn’t creating as much voltage.
It’s pleasant

Good ! , and where is code ??
Hi Aaron, I have the same exact project but can’t seem to get it to work. I probably don’t connect the led’s correctly. I got the emitter to 5v on arduino and one to ground. The detector then gets 5v from same source and one to ground. I then connect the 5v from detector to the led and to ground but it never comes on. But i can see the little red ir in the dark emitter.Maybe you can email me a sketch how to exactly connect both ir’s and the led.
Thanks,
Nick