 Update: A useful comparison chart of Arduino Starter kits has been posted (by me) at ConductiveResistance.com. I invite you to check it out there.
If you don’t know already, I am a huge fan of the Arduino. Arduino is the name of Microcontroller kit. It’s open source, easy to learn, and a great way to get into electronics/physical computing. This week, one of my favorite Electronics companies, SparkFun Electronics released an “Arduino Starter Kit”. Another one of my favorite Electronics companies, Adafruit Industries, released their own “Arduino Starter Pack” quite a while back. I thought I’d take a look a little more closely at what you get…
First off, I haven’t purchased either of these. I already have an Arduino, and a bunch of associated components to use with it. I don’t need either of these because, for the most part, I already have both of them, sans an extra Arduino (Or the newest model for that matter). Hopefully reading this will give anyone an idea of which kit would be better for who.
I’m going to start out with the Adafruit package, because Alphabetically it’s first and the pack came out first:
Adafruit Industries Arduino Starter Pack
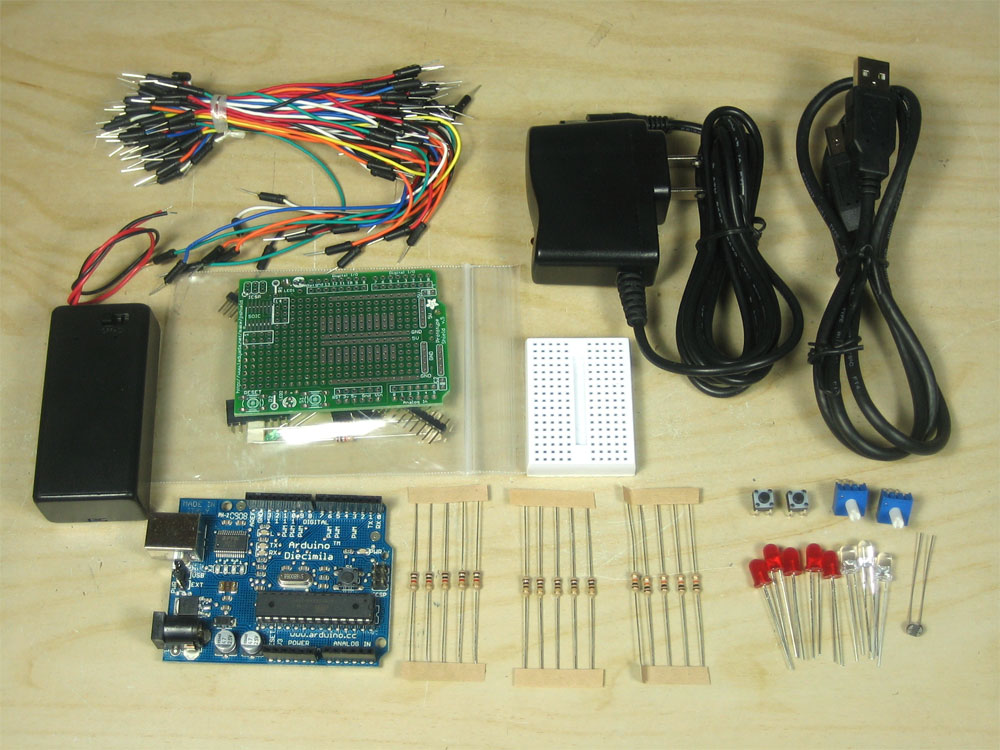
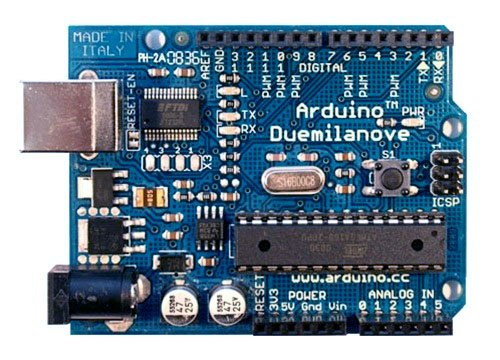
Arduino Duemilanove w/ATMega328 – This is the most recent model of Arduino, with the most recent Micro. I think the only thing to mention here is the LadyAda (Limor Fried) has developed a special Arduino Bootloader that works a little faster on bootup than the stock Arduino Bootloader. This comes pre-burned onto the chip, so if you want it, you’ve got it.
3′ USB A-B cable – I can’t believe you don’t have one of these already, but if you do it’s probably currently connected to a printer. It’s nice to have one dedicated for programming. There is also the possibility that you don’t have one. It makes sense to include one because this is a Starter pack. I appreciate they don’t make assumptions.
Protoshield Kit – This is an awesome thing to include in the starter pack. Why? Because if you’re getting to know micro-controllers, my guess is that you’re also really diving into electronics for the first time. I think the days of going from simple analog logic to Micros is gone. I think it happens the other way around. At any rate, this kit gives you some experience soldering, polarity, and a few other things that will help you in learning and understanding your Arduino. Also, coupled with the mini-breadboard it makes for a great prototyping.development tool.
9v Regulated DC adapter and 9v Battery Case w/2.1mm plug – These are both great side-items to have. When I got my Arduino, I only had the option of getting power from the USB cable because I didn’t have a 2.1mm barrel plug sitting around to supply power (Actually, I may have, but I didn’t know early on) I bought my own AC adapter from Adafruit. It works great. I will give you two warnings though:
- When supplied from a source other than the USB cable, the 3.3v pin will supply more than 3.3 volts. My 5v pin supplied more than 5v. More information is available on the Duemilanove Hardware Page
- Your Arduino will get hot!
Bunch of cool components! – These are the kinds of things I wish were available at every corner store, but are unfortuantely not. Some of them can be picked up at Radio Shack, but not as conveniently and probably without the helpful explanation.
- 1k and 10k Potentiometers – Great for experimenting with resistance. 2 commonly used values.
- 2 Push-buttons – For when you want to interact with your Arduino
- 5 Red Diffused LEDs + 3 LEDs in different colors – 5 diffused (red looking) red LEDs. Also, Because Red get boring, you also get clear Red, Green, and Blue. This is nice because it helps to have different colors for association.
- 100 ohm, 1K ohm, and 10K ohm – One of the most frustrating things starting out in Electronics is realizing you need resistors of values you don’t have, and it’s not really clear what values you ought to get early on. 5 each so you have room to breath in your project.
- Cds photocell – aka Photoresistor. Shoot light into it, it becomes less resistant.
A whole heck of a lot of Jumper wires – I was really surprised at the number of wires that Adafruit includes in their pack here. 75! That’s a LOT of connections for you to make before you run out.
SparkFun Electronics Arduino Starter Kit
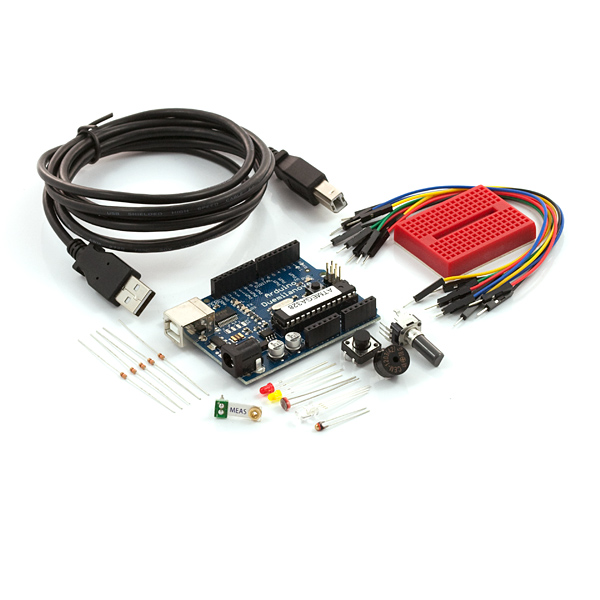
Arduino Duemilanove w/ATMega328 – The base of the kit, comes ready to go with the chip burned with the bootloader.
6′ USB A – B cable – So you have what you need to get started. Great for Power too. The length here is nice.
Red Mini-Breadboard – So you have something to plug stuff into. These are great. I have a blue one which I’m using to connect with a component. You get one in SparkFun’s signature Red.
Jumper Wires – As near as I can tell, you get 20 of these, in 5 assorted colors. From experience, I can tell you these are great. They are around 6 inches (155mm according to them).
Piezo Vibration Sensor – So you know when the Phat Beats are being dropped. It senses vibrations like those put out by music, or movement. You could build a project that you would sense a T-Rex approaching, instead of having to rely on a cup of water precariously placed on your dashboard.
Photocell – A Cds light-dependant resistor. How bright is it? Now you can know. (Albeit, rather Ambiguously)
LEDs – It doesn’t say explicitly on the website, but from the picture, it looks like you get 3. Two color-diffused(Red and Yellow), and a Tri-color LED that can produce virtually any color you like (which is awesome).
A Trimpot – A variable resistor aka a potentiometer. The resistance value isn’t listed, but I’d guess 10K ohm. I actually can’t find it anywhere else on their site, so it’s hard to tell.
A Buzzer – One of those things you can hook up to voltage and it starts making annoying sounds. Used in computers when the manufacturer is too cheap to put in an actual speaker (I don’t think that happens anymore…)
Big ol’ button – Okay, that’s my name for it. They called it a 12mm button. This is nice if you need a big target. I like bigger buttons, and these seem to be a bit of a rarity.
5 330ohm resistors – The heart of electronics design, you’ve got to have some resistors.
Comparing the two:
In case you didn’t want to scroll up and down and thoughtfully consider both packages, I’ve decided to do it for you… I’m cool like that.
Jumper Wires: Adafruit gives you way more jumper wires in more colors. The only downside that I mention here, is that Adafruit’s wires are just a bit shorter than Sparkfun’s. I can’t imagine this is a deal-killer for anyone. If you’re worried about wirelength, you should really consider the vastly greater number of wires you get with Adafruit.
LEDs: This is kind of a toughy. You get more LEDs with Adafruit, but you get sort of an uber-LED with the SparkFun kit.
Cables: Adafruit gives you more options, but their USB cable is shorter. If you’re working with a laptop (or a desktop which is actually on your desk), this isn’t a problem, but I’ve always been surprised how short 3 feet turns out to be. You have more power options with the Adafruit pack.
ProtoShield: You get one with Adafruit. You don’t with Sparkfun. Looking at SparkFun’s site though, it looks like you can buy a protoshield kit from them which brings the cost up to about the same as Adafruit’s. I wonder if they ought to throw that in there for competitiveness.
Other components: SparkFun’s kit comes with a variety of sensors and… attention-grabbing-things (what is the opposite of a sensor?). Adafruit’s pack is prepared for you to put them together in a specific way.
Costs: Flat out, the SparkFun kit is $15 less (but see above note about the protoshield) than the Adafruit kit. The cost is a mix though. As I said above, you don’t clearly get as many starting points with the SF kit as with Adafruit. I think that you can acutally build a complete product with Adafruit’s kit, but with the Sparkfun kit you’re limited to cool projects. On the other hand, I think you have a much wider range of cool projects with Sparkfun.
Roundup of parts separately – “What if I want to buy it ala carte?” Well, I did the math so you didn’t have to:
- Adafruit: ~$75.00 – The components for the tutorial aren’t listed separately, so I guessed $5.00 for the resistors, LEDs, and Photocell.
- SparkFun: ~$56.00 – They don’t have the trimpot listed on their site, I assumed $1.15 (because that rounded it up nicely.)
Adafruit Industries is giving you more for your dollar, SparkFun is giving you a wider selection of components.
Go Buy One – Adafruit Industries SparkFun Electronics
Both kits have their strengths obviously. When I look at them, SparkFun’s kit seems to be designed more for the tinkerer, whereas Adafruit’s leans more towards the absolutely beginner – the person who is truely stepping into electronics and Microcontrollers for the first time. One thing that the Adafruit kit focuses on is it’s association with the tutorials available on the sister site, Ladyada.net. These tutorials will get you into the basics of programming the Arduino, and I think give you the means to start exploring on your own. The SparkFun kit stands out to me as a kit for a person who is willing to venture out on their own a little bit more. Diving headfirst into forums and the Arduino playground, a person armed with this kit could really produce some awesome stuff. You have to be an exploring personality though -SparkFun doesn’t provide and specific starting points. Either way, you’re getting value, so figure out which you think you’d do well with, and let me know your opinions.
Lastly, these aren’t the only Arduino Starter kits out there. MakerShed has one, and so does Hacktronics, and I’m sure there are a handful more out there. Look around. If you have questions, or are looking for suggestions, leave a comment and I’ll see if I can help!
Update:
There’s more to see! I’ve reviewed 5 more kits including 3 from the UK. Check out part 2 of this review.
Interesting series of posts Aaron. I’ve had the Adafruit starter kit since the summer but never got around to doing much with it other than attaching a BlinkM (bright-ass RGB led) and playing with that a bit. My reason for getting it was to build a cool ambient lighting system that changed colors based on some network factor – probably how much unread email I have in my inbox.